The highest slice count isn’t automatically the right scanner for a veterinary practice. A useful veterinary CT buying checklist starts with your ten most important examinations, expected case mix, patient sizes, and the decisions each scan must support. Then compare image quality, acquisition performance, room fit, and workflow. For dental-focused work, include cone-beam CT in the comparison.
A scanner can have impressive headline specifications yet add little if its field of view, patient capacity, or image workflow doesn’t suit your routine cases. This guide turns the decision into practical steps: distinguish detector rows from slice counts, compare scan and reconstruction performance, assess cone-beam CT for dental imaging, and map the system to your patients, room, and workflow. It also covers what to include in a five-year ownership estimate and how DICOM/PACS, training, radiation-safety planning, and service terms affect daily use. The goal isn’t to choose the biggest system, but one suited to the examinations you plan to perform and the way your clinic operates.
Key Takeaways
- Compare physical detector rows, acquired slices, and reconstructed slices as separate specifications, then assess how scan and reconstruction speed fit your workflow.
- Plan radiation protection and room infrastructure around shielding, access control, electrical capacity, cooling, and service clearances.
- Match the scanner’s aperture, field of view, table capacity, and patient positioning options to the animals and anatomical regions you expect to scan.
- Include the supporting equipment, software, training, maintenance, and installation needs in your ownership plan, not just the scanner itself.
- Assess cone-beam CT alongside conventional CT for dental-focused work, using representative images to judge whether the system fits your clinical priorities.
Detector rows, slice count, and acquisition performance
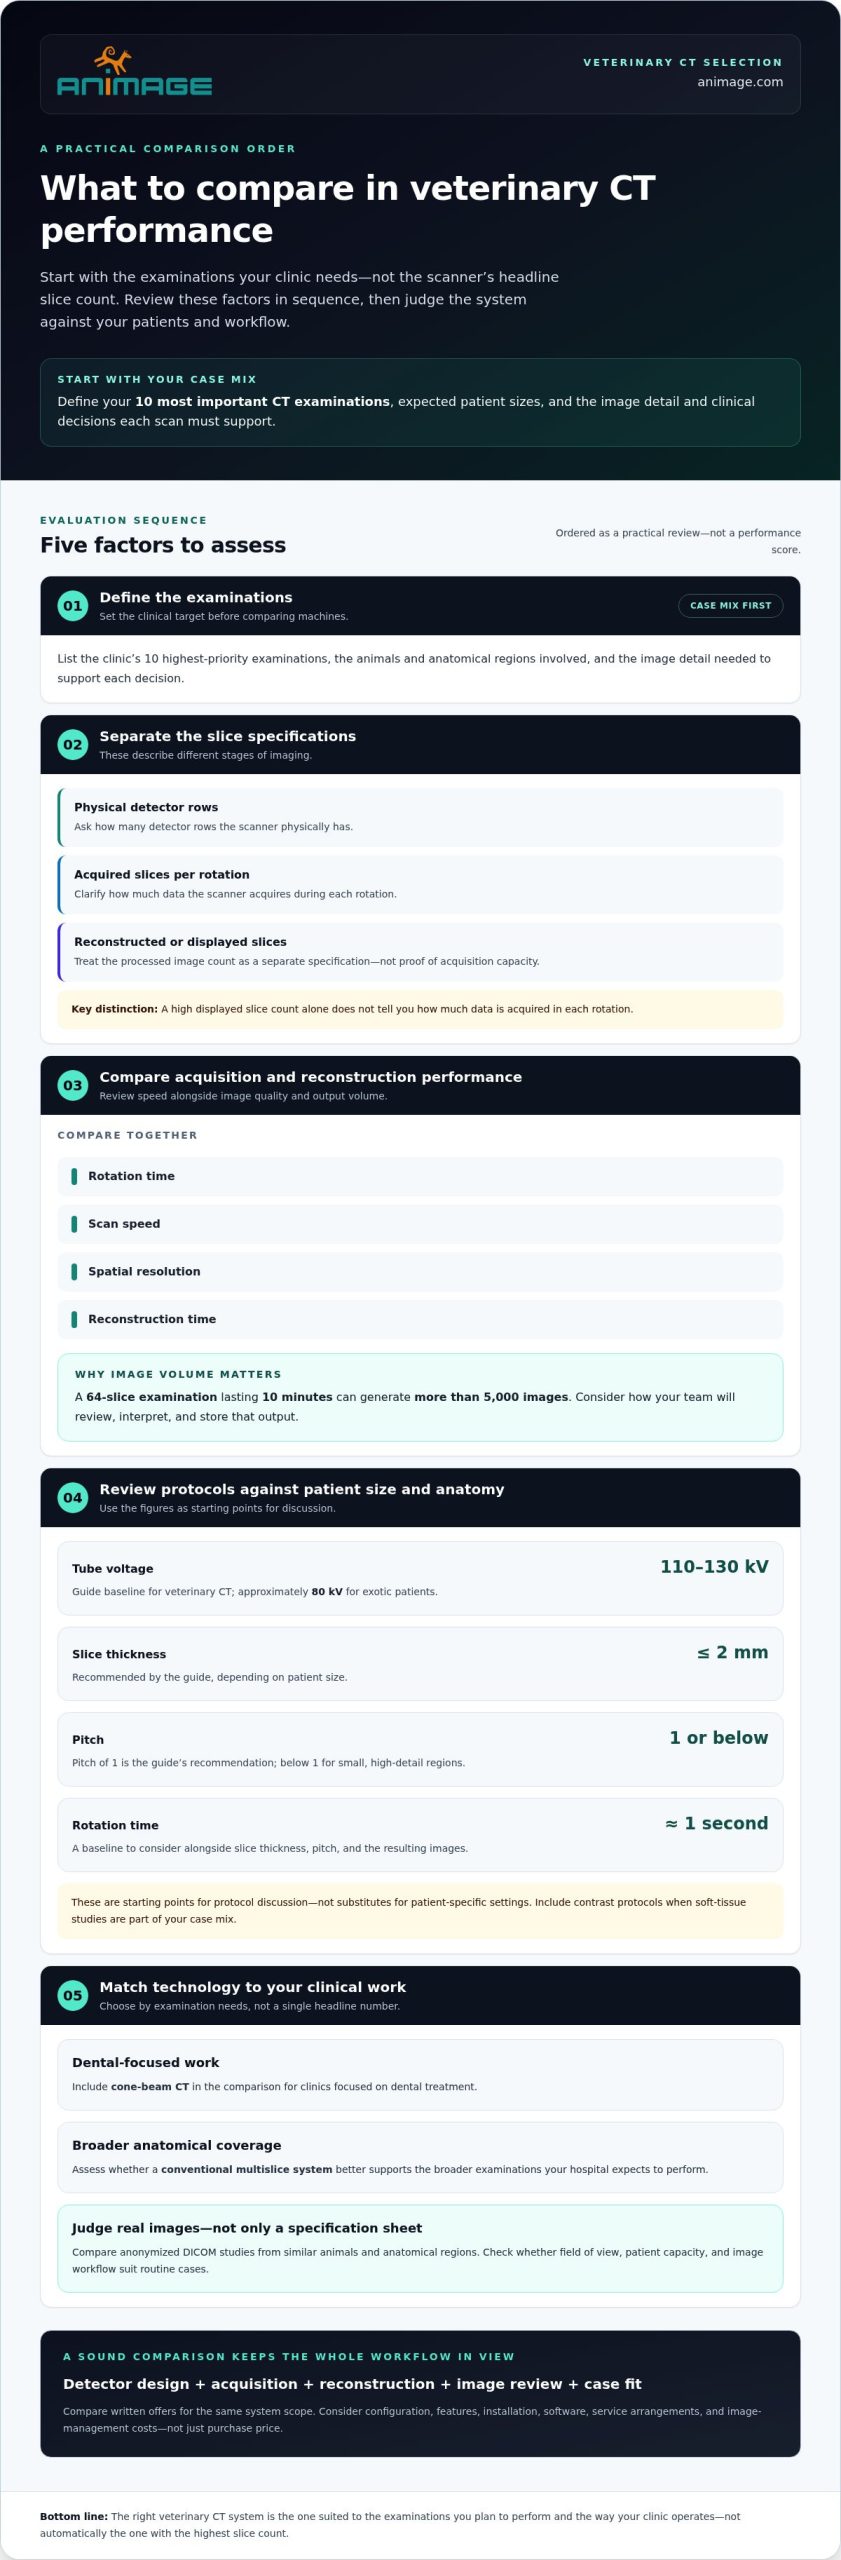
Compare detector design with the examinations your hospital expects to perform. Start by defining your ten most important CT examinations and the image detail each needs to support.
-
Compare Detector Rows and Slice Count
Ask for physical detector rows, acquired slices per rotation, and reconstructed or displayed slices as separate specifications. They describe different stages of image acquisition and processing. A high displayed slice count alone doesn’t show how much data the scanner acquires during each rotation.
Compare the specifications alongside rotation time, scan speed, spatial resolution, and reconstruction time. For example, a 64-slice examination lasting 10 minutes can generate more than 5,000 images. That volume affects image review and storage, not just image acquisition. Assess whether your team can interpret and manage the output in its diagnostic imaging workflow.
-
Review Exposure Settings, Slice Thickness, and Pitch
Request the scanner’s protocols for the patient sizes and anatomical regions you plan to image. The guide’s baseline tube voltage recommendation is 110-130 kV for veterinary CT, with approximately 80 kV for exotic patients. These are starting points for protocol discussion, not substitutes for patient-specific settings.
Compare slice thickness and pitch against your intended use. The guide recommends slice thickness of 2 mm or less, depending on patient size, and pitch of 1, or below 1 for small, high-detail regions. A baseline rotation time is approximately one second. Consider these figures together: a thin slice, pitch, and rotation speed all influence acquisition and the resulting images. Include contrast protocols where soft-tissue studies form part of your case mix.
-
Evaluate Cone-Beam and High-Slice-Count CT
Match the imaging technology to your case mix before comparing headline specifications. Clinics focused on dental treatment may consider cone-beam CT. If your hospital also needs broader anatomical coverage, assess whether a conventional multislice system better supports those examinations. Compare anonymized DICOM studies from similar animals and anatomical regions, rather than relying only on a specification sheet.
Compare prices by system configuration and slice-count category, but don’t assume slice count alone determines the total. In Poland, pricing depends on the case and is provided after a quote request. Relevant factors include configuration, features, installation, software, and service arrangements. Compare written offers covering the same scope, including acquisition performance and image-management costs, not just the scanner’s purchase price.
Radiation safety and CT room requirements
Plan the room, shielding, and workflow before selecting a scanner. Include radiation planning in your veterinary CT buying checklist, alongside staff training and patient handling.
-
Assess Clinic Space Requirements
Measure the proposed CT room and map the scanner footprint, control area, access routes, and service clearances. Veterinary CT installation typically requires 15 to 30 square metres. Use that range for early planning, then fit the layout to the selected system and room.
Include electrical capacity, grounding, cooling, and space for patient preparation and monitoring. A room that fits the gantry may still restrict staff movement or access to anesthesia equipment. Build access control and warning systems into the layout. Plan where staff will operate the scanner while maintaining appropriate separation during exposure.
-
Plan Radiation Shielding
Arrange shielding calculations as part of facility planning, before finalising room construction. The required design depends on the scanner, room layout, surrounding spaces, and expected imaging volume. Don’t assume one wall specification will suit every clinic or installation.
Map adjacent areas and identify where workers and the public may be present. The International Atomic Energy Agency provides veterinary radiation-safety guidance on facility design and protection of workers and the public. Use shielding calculations to inform the room design, then coordinate the result with access control, warning systems, and the control area.
-
Review Radiation Safety Considerations
Build radiation protection into the clinical workflow, not just the room. The American College of Veterinary Radiology explains the CT process and the importance of conscientious radiation-safety practices in veterinary imaging. Define who can enter during scanning, how access is controlled, and how staff communicate before acquisition begins.
Use your veterinary CT buying checklist to document who controls access, who confirms warning systems are working, and how staff follow each protocol. A clear workflow should cover patient positioning and exposure while keeping unnecessary personnel outside the controlled area. Review procedures when scanner protocols or room arrangements change.
-
Confirm Training and Staffing
Assign CT operation to technologists trained and experienced in scanner use. Specify who positions and monitors the patient, operates the scanner, and manages images during each examination. Staffing should support safe patient handling and a consistent clinical workflow, rather than relying on one person to cover every task.
Use a written training plan covering operator and veterinary applications training, protocol setup, calibration, software, and DICOM/PACS workflows. Include remote assistance and refresher training. Practise access-control and warning-system procedures alongside scanning protocols, so staff know how to protect themselves, colleagues, and the public during routine diagnostic imaging.
Scanner geometry, field of view, and patient capacity
Match scanner geometry to the patients, anatomical regions, and positioning workflows your clinic expects to handle. Assess patient fit and movement together, rather than as separate purchasing decisions.
- Compare gantry aperture, usable field of view, table width, table load, and scannable body length against your expected patients. Include the smallest and largest animals in your assessment. A 70 cm gantry bore may suit farm animals such as pigs and horses, but aperture alone doesn’t establish whether a patient or target region fits.
Ask for written patient-fit details, layout drawings, and available positioning aids. Map where the patient lies and how the target anatomy aligns with the field of view. For a long body region, assess scannable length and table travel. For a small, localised region, check that positioning keeps the anatomy within the usable field during acquisition.
- Plan alignment around the anatomical area and examination. Record how the patient must be positioned for each priority scan, then compare that workflow with table dimensions and gantry clearance. Include anesthesia tubing and monitoring cables in the fit assessment. A patient may fit inside the aperture yet be difficult to position if lines restrict movement or interfere with scan setup.
Confirm that positioning aids support the planned orientation and keep the target region stable. The goal is repeatable alignment, not simply getting an animal onto the table. Include representative patients and scan regions in the review, such as a small animal’s thorax and a larger patient’s limb.
- Design the patient workflow around immobilisation and monitoring. Veterinary patients must be anesthetized and immobilized for most CT studies. Allow space and clearance to position the patient, manage anesthesia equipment, and route monitoring cables without obstructing gantry movement.
Before acquisition, make patient fit and setup part of the pre-scan check: confirm the target anatomy is within the field of view, the patient is positioned securely, and tubing and cables have a clear path. These checks connect scanner geometry with practical clinical use. Table load and usable body length matter alongside aperture, particularly when patient size varies across the clinic’s case mix.
- Separate equine requirements from small-animal workflows. Standing equine CT uses a restraining device for a sedated horse while the gantry moves around the patient. The scanner rotates 360 degrees around the horse’s leg to capture views from every angle. A standing distal-limb scan typically takes 2-5 minutes.
Standing CT may be used for suspected bony injury localised to the fetlock, pastern, or foot. Recumbent equine CT requires general anesthesia. Compare how each configuration handles restraint, positioning, and patient movement before selecting equipment. These workflows place different demands on scanner geometry and clinical preparation.
Complementary equipment for a veterinary CT room
Assess the complete room setup, not just the scanner. A five-year ownership estimate should include purchase-related and operating costs, as well as equipment condition, service coverage, and image workflow.
A CT warranty and service contract should define coverage for the X-ray tube, detector, maintenance, remote diagnostics, spare parts, response time, and major repairs. Any uptime commitment should state its terms, exclusions, and remedy. Don’t treat it as a substitute for clear repair procedures.
- Inventory the equipment and software needed around the scanner. Map how the animal moves through preparation, scanning, image review, and data storage. Include anesthesia and monitoring equipment in the workflow, then account for the room layout and clearances needed to use it without obstructing patient handling.
For image management, assess DICOM storage and transfer, original DICOM export, reconstruction tools, protocol customization, backup, and PACS integration. If your hospital shares studies with external readers, include teleradiology in the workflow assessment. These components affect how images move from acquisition to clinical review.
- Arrange an independent equipment assessment before committing to used or refurbished equipment. Ask the assessor to identify components that may need near-term replacement and distinguish immediate requirements from future maintenance. A scanner can be operational while still needing replacements that change the ownership plan.
Review the X-ray tube, detector coverage, software, and service history separately. Record the condition of each component and relate the findings to your intended case volume. This creates a more useful comparison than a general label such as “refurbished” or “advanced.”
- Compare refurbished equipment by condition, configuration, included software, and remaining support arrangements. Treat refurbishment status as a starting point, not a condition report. Compare the scanner’s capabilities with your planned examinations and the images needed for diagnostic decisions.
Build the same five-year ownership estimate for each configuration. Include shipping, customs, installation, training, software licenses, maintenance, replacement parts, and service travel. Keep each cost category visible so a lower initial purchase amount doesn’t conceal different operating requirements.
- Put warranty and service terms into a written comparison. Separate coverage for the X-ray tube and detector from routine maintenance, remote diagnostics, parts, and major repairs. Record the stated response time and repair process, including how the system is assessed when a fault interrupts scanning.
Then connect service terms to your clinic’s expected imaging volume and staffing. Identify who handles software, DICOM/PACS issues, and operator refresher training. A written support plan makes responsibilities clear. An uptime guarantee is meaningful only when its scope, exclusions, and remedy are defined in writing.
CT system selection and cone-beam technology
Small-animal clinics can compare cone-beam CT with conventional multislice CT. Choose based on examination type, anatomical coverage, and the image quality needed for clinical decisions, not a single headline specification.
- Start with the examinations your practice expects to perform. Cone-beam CT may suit clinics focused on dental treatment, while conventional multislice CT can support a broader range of veterinary examinations. A dental-focused clinic and a referral hospital with varied case types may therefore have different priorities.
List the anatomical regions and decisions that matter most. Chronic nasal discharge in cats and dogs is a common reason clinics use CT. If your expected work includes thoracic or abdominal imaging, assess whether the scanner’s field of view and acquisition workflow suit those cases. The right system is the one that supports your intended clinical use.
- Compare image quality using anonymized DICOM studies from animals similar to your patients. Include the anatomical regions you plan to examine, such as teeth, nasal structures, or the abdomen. Review images at the detail level needed for your clinical decisions, not just as selected examples on a presentation screen.
Assess image coverage, visible structures, and how the data can be reviewed. Ask how the scanner handles reconstruction and export into your imaging workflow. DICOM is the international standard for producing, storing, displaying, sending, querying, processing, and retrieving medical imaging information. Original DICOM export supports image handling beyond the scanner console.
- Match the modality to the tissue and diagnostic question. Most CT scans don’t provide high-quality images for identifying or tracking neurological conditions involving the brain and spinal cord. For suspected spinal cord disease in small animals, CT has replaced myelography but remains relatively inferior to MRI for this use.
Soft-tissue studies of structures such as the brain and abdominal organs are nearly always contrast enhanced. Consider this workflow when assessing protocols and image review. CT provides useful anatomical information, but it isn’t a universal substitute for other modalities when the target is soft tissue or neurological disease.
- Consider whether your practice needs more than CT. Clinics planning fluoroscopy alongside digital X-rays may benefit from evaluating a multi-modality device. Compare how these imaging tasks fit into daily room use, staffing, and image management, rather than treating each modality as an isolated purchase.
For a focused comparison, assess a veterinary platform that combines CT with digital radiography and fluoroscopy. Explore a multi-modality veterinary imaging platform when those capabilities match your intended workflow.
Animage: FIDEX+
Animage’s FIDEX+ is a compact veterinary imaging platform combining cone-beam CT, digital radiography, and fluoroscopy in one device. It may suit practices assessing dental imaging alongside X-rays or fluoroscopic examinations, without requiring each modality to be a separate system choice.
Use your selection criteria to assess whether this multi-modality configuration fits your intended patient mix, examination priorities, and clinical workflow. Compare its role with your required field of view, image review process, and room plan. FIDEX+ is designed for animals and is available to veterinary clinics, referral hospitals, and research institutions.
To discuss whether FIDEX+ fits your practice’s imaging requirements, contact Animage or visit animage.com.
Turn Your Requirements Into a Clear Decision
Before moving from research to procurement, turn your priorities into a decision brief for your clinical and operational teams. Define which examinations matter most, what image quality those decisions require, and how the system must fit your practice’s workflow. This keeps the discussion grounded in clinical use, rather than a specification sheet alone.
Use your veterinary CT buying checklist to compare configurations against that brief, then identify any trade-offs your team needs to resolve. A system that combines imaging modalities may be relevant if your plans extend beyond CT. Animage supplies FIDEX+ for veterinary imaging.
Review the platform against your practice’s requirements and decide whether it belongs in your shortlist. Explore FIDEX+ with Animage as you plan your next step. A focused decision now can help your team choose equipment that fits the work ahead.
Frequently Asked Questions
What slice count and image quality specifications should a veterinary CT have?
Choose slice count and image quality based on the anatomical regions and decisions your practice needs to support. Compare detector rows, acquired slices, reconstructed images, resolution, and reconstruction time separately. Then assess anonymized DICOM studies from animals with similar anatomy. For example, compare dental studies for fine structural detail, then review abdominal images if those examinations are part of your planned case mix. A specification sheet cannot show how useful the resulting images are.
How do new, refurbished, and used veterinary CT scanners compare in cost and risk?
New systems offer a different condition and support profile than refurbished or used equipment, but purchase price alone doesn’t capture ownership risk. Refurbished scanners may need replacement parts or maintenance sooner, while a used system’s history and current component condition affect its remaining usefulness. Arrange an independent equipment assessment and compare the findings with a five-year ownership estimate. Include software, parts, maintenance, installation, and service travel so each option is assessed on the same basis.
What anesthesia, contrast-agent, radiation-exposure, and patient-safety risks should clinics consider?
Plan for anesthesia and immobilisation, since most veterinary CT studies require both. CT uses ionising X-rays, so room access, shielding, and staff workflow must address radiation protection. Contrast-enhanced imaging adds injection planning; soft-tissue studies of the brain and abdominal organs are nearly always contrast enhanced. Build protocols around patient size and examination purpose, and include monitoring, patient positioning, and controlled access in the procedure. This connects diagnostic needs with practical safeguards before scanning begins.
What room, shielding, power, and HVAC requirements apply to installing a CT scanner in Poland?
Plan a dedicated room, typically 15 to 30 square metres, with shielding based on calculations for the scanner, layout, adjacent spaces, and expected imaging volume. Include a control area, access control, warning systems, electrical capacity, grounding, cooling, and service clearances; confirm the design for the specific installation.